Welcome

Hello and welcome to my blog of card crafts. I am happy that you stopped by for a visit. I hope you can visit often. Have a wonderful and blessed day! "I will praise thee; for I am fearfully and wonderfully made: marvelous are thy works; and my soul knows right well." Psalm 139:14

Wednesday, October 31, 2012

Sparkle N Sprinkle Sketch Challenge


Hi Everyone! I pray that all the north easterners are fairing well after the big storm. My heart goes out to all that were in the storm's path. After seeing all the destruction on the news, I know it will be awhile before things get back to normal. Today is the start of the November Sparkle N Sprinkle sketch challenge. I hope you will join to be eligible for a great prize! Here is the sketch and the card I made with it, using the Candle Centerpiece stamp.


SNSSC13 Card due 10-25

Thanks so much for stopping by. I hope to see your card in the challenge soon!

Monday, October 29, 2012

Technique Tuesday -- No Iron Batik

It is Technique Tuesday once again at Sparkle N Sprinkle! I hope you are having a good day.  One of our designers, Marie, laughed at me when I saw that this technique did not involve any ironing! Well, if  I can remove any step from a technique to do it faster, the better for me! LOL! Marie and I had so much fun working with this that I want to share it with you today!


Supplies needed:
  1. white coffee filter
  2. Versa Mark ink pad
  3. clear embossing powder
  4. dye ink sprays or stains
  5. paper towel
  6. background stamp or single stamp
  7. heat gun
First,  stamp your background or stamp all over the coffee filter using Versa Mark ink. You will not be able to see where you are stamping, but if you overlap some it will not matter since you are making a background. At the end you will see I overlapped some on this background.


Now pour clear embossing powder over the coffee filter and shake off the powder.


Heat the embossing powder and you will be able to see through the embossed areas when you have finished. There is no need to iron like you do with other batiks! YEAH! LOL! As you can see, I overlapped some of the stamping, but it looks fine on the finished card.


Now spray on your colors or use stains over the coffee filter. Blot off color on the embossed areas with a paper towel. I used sprays on this background, but stains work very well also and are not as messy!


This is so easy and a lot of fun. Marie and I made a bunch of backgrounds with this technique. I hope you will give it a try! Thanks for stopping by and have a wonderful day!

APRIL

Sparkle N Sprinkle supplies used:
  1. Bee Hummingbird 3578-451B
  2. Heart With Wings 3579-451B
  3. Brocade Background 3125-398R
  4. Waterscape glitter G1108
  5. Versa Mark ink pad 99702

Fall Fun

I hope everyone is doing well on this breezy, cold Monday! I pray everyone will fair well through the big storm! I am entering this card in the House Mouse challenge HMFMC131 and blog hop. The mice were holding up hearts, but I added leaves and a pumpkin to their hands for Fall! Thanks for a fun challenge.


I appreciate each one of you that stops by to check my blog! have a wonderful day!

Sunday, October 28, 2012

Kitty's Fall

Hi and welcome to my blog! I have been working on a card today for a few challenges. This card reminds me of my two sweet kitties who love to have the window open to smell the smells and hear the sounds! They will stay on the window sill for hours! Don't you just love this sweet Penny Black kitty? I stamped and cut him out to fit the window. The background paper is from Basic Grey. The sparkly glitter is the new velvet glitter from Sparkle N Sprinkle called Luau Green.


Thank you so much for stopping by. I hope you have a great and blessed day!

Challenges entered:

1. Basic Grey -- Anything Goes
2. Penny Black -- Sketch Challenge
3. Joan's Gardens -- Fall with Window, Leaves and Border

Monday, October 22, 2012

Technique Tuesday -- Gold Leaf Acetate

Welcome back to the Sparkle N Sprinkle Technique Tuesday! Today I want to show you an easy technique.  I used the Zebraon my card, but this technique would also be great for all those Fall cards you are making.


Supplies needed:
  1. acetate sheet
  2. double sided sticky tape sheet or Xyron machine
  3. gold leaf pieces
  4. stipple brush
  5. black permanent ink pad
  6. stamp
I ran my acetate through the Xyron machine.


Peel off paper and add gold leaf pieces to the sticky side of the acetate until it is covered. Press the pieces down with your fingers.


When it is covered, take the stipple brush to brush off and stray pieces.


Stamp image on the other side of the acetate with permanent black ink.


This is such an easy technique, but one that will wow! Have fun trying it! Thanks for stopping by and have a wonderful day!

April

Sparkle n Sprinkle supplies used:
  1. Zebra 1758-337N

Friday, October 19, 2012

Abby & Walter's Birthday

Hi Everyone! The design team at Sparkle N Sprinkle has been making some new cards from the new released stamp sets. I made some cards with the Abby & Walter Birthday set. Aren't these images  darling? I had fun making these cards. Thanks for stopping by. I hope you are having a good weekend!

Stamp Set 476 - Abby & Walter's Birthday


Tuesday, October 16, 2012

Technique Tuesday -- Tunnel Card

Hi! It is Technique Tuesday time here at Sparkle N Sprinkle. Halloween is right around the corner. I want to show you this Halloween tunnel card I made.  Tunnel cards are fun to make and help to show off a focal point. I hope you will enjoy making one of your own!


Supplies needed:
  1. 2 different patterns of patterned paper - both cut at  5 1/2"   x  8 1/2"
  2. die cut shape for window
  3. adhesive
  4. stamps and color medium
  5. embellishments
Fold the bottom patterned paper in half, open it up and lay it flat down on your work surface .  Add your focal point to the center. Mine is a die cut haunted house. You might want to add a stamped scene, a saying, etc.


This is the time to add any glitter or other embellishments to the center piece.  I added glitter to the windows.


Take the other patterned paper piece and fold it in half.


Open it up and fold the 2 side flaps in half.


Isn't this great? No measuring! Now take your die and place it on the center fold and cut it out with your die cut machine.


Now place adhesive on the outer flaps and adhere on top of the other patterned paper piece.


Add embellishments and stamps to the front.  I hope you will try this fun card. Thanks so much for stopping by. Have a wonderful day!

April

Sparkle N Sprinkle supplies used:
  1. Autumn Medley glitter G1013
  2. Candy the Sweet Halloween Witch  digi022
  3. Fly Away Witch digi123

Thursday, October 11, 2012

12 Tags of 2012 -- October

Hi Everyone! We have been having some beautiful Fall days lately! I hope you have been enjoying them. I want to show you a tag I made for Tim Holtz's 12 Tags of 2012 for October. You can see his demo and tag by clicking here. I always enjoy trying  his different techniques. Thank so much for stopping by. Have a great day!


Monday, October 8, 2012

Technique Tuesday -- Alcohol Ink Blot

Hi Everyone! It is time for Technique Tuesday once again at Sparkle N Sprinkle.  We are certainly having Fall weather here this week.  I decided to make a Fall card with this technique.  I hope you will enjoy doing this.


Supplies needed:
  1. 2-3 colors of alcohol inks  -- I used a green, gold and brown
  2. blending solution or 91% alcohol -- I used the alcohol
  3. white glossy card stock
  4. spritzer bottle
  5. blending tool
  6. permanent ink -- black or brown -- I used a dark brown
Apply several dots of each color of alcohol inks onto the blending tool and then spritz the 91% alcohol onto the blending tool.  Tap the blending tool all over the glossy card stock. You might need to spritz a little more alcohol on the tool as you go and also add a little more of the ink. Keep tapping until the card is covered with color.


Now take your spritzer bottle of alcohol and spritz the alcohol in the middle of the card in about a quarter size.  Let the alcohol spread. As it spreads the alcohol pushes some of the color away from the center , bleaches out the color and makes a neat frame!


Now you can stamp an image in the frame using permanent ink.


Here is another sample making several small frames with the alcohol.


Here is another sample using other colors.


Thank you for stopping by.  Enjoy playing! Have a wonderful day!

April

Sparkle N Sprinkle supplies used:
  1. Swirly Oak 3278-410G
  2. Leaf Swirl 3287-410B
  3. Celestial Glitter G1031
  4. Swirly Maple Leaf 3281-410A
  5. Swirly Oak Leaf 3280-410A
  6. Second Spring 3281-410A

Thursday, October 4, 2012

Picking Apples

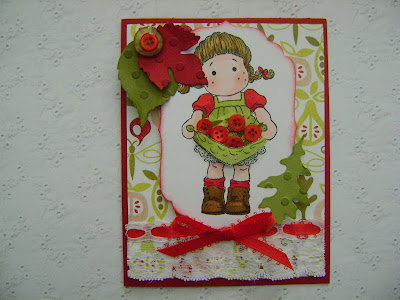
Hello Everyone! We have a beautiful day here. I have been doing some crafting and I want to show you a card I made for several challenges! I have not used a Tilda stamp in awhile, so it was fun to use this little cutie who is holding a skirt full of "apples"! My background paper is from Basic Grey called Offbeat. The leaves are cuttlebug dies and they were embossed with a dot cuttlebug embossing folder. My TIP is to swipe Versa Mark ink over the raised embossed areas on the leaves to make them stand out more. Thanks for stopping by. I hope your day is filled with good things like Tilda's skirt!


Challenges entered:
Basic Grey -- Ribbon and Lace
Magnolia-licious -- Buttons
The Cuttlebug Spot -- Fall
Top Tip Tuesday -- Good with Food

Wednesday, October 3, 2012

Shoe Box Party

Hi and welcome to my blog. I hope you are enjoying your day. On Monday I went to my local stamp club called the Stamping Divas and we had a shoebox party. Each person made a sample card to put in their box and also had enough supplies in the box for 12 people to make it. At the meeting we passed the boxes around and we each made as many cards as we could. I didn't realize I had made so many! Our theme for this shoebox was to have at least 2 textures on your card. It was fun seeing what everyone came up with! Here is my stash of cards I made!


Thanks for stopping by. I hope you enjoyed looking at what all our talented ladies made! Have a great day!

Monday, October 1, 2012

Technqiue Tuesday -- Bargello


Hi Everyone! Welcome to the Sparkle N Sprinkle Technique Tuesday. I am showing the Bargello technique today. Bargello is actually a form of stitching that forms a variety of zigzag or slanting designs, but has crossed over into cardmaking. I have not done this technique in a long time, so it was fun doing it agian to create a different background and design to my cards.
First cut some strips of paper. These are 1/2 inch strips.


I wanted to make an interesting background, so I layered these in a large wave.


Here is the card I made with the background.


Another way to do this technique is to make your strips different sizes. I used 1/4 inch and 1/8 inch strips for this card. I alternated the witdths and wove them in the corner to make a neat design.


Here is the card I made with this.


There are many ways to use the strips of paper. You can make a diagonal design, herringbone, etc. I hope you will play with this and have fun coming up with some unique designs of your own! Thanks for stopping by and have a great day!

April

Sparkle N Sprinkle supplies used:
  1. 1914 Chevy Royal Mail Roasdster 1335-285E
  2. Floral Magnolia set 328  -- tulips
  3. Waterscape glitter G1108


Blog Archive