Welcome

Hello and welcome to my blog of card crafts. I am happy that you stopped by for a visit. I hope you can visit often. Have a wonderful and blessed day! "I will praise thee; for I am fearfully and wonderfully made: marvelous are thy works; and my soul knows right well." Psalm 139:14

Monday, December 31, 2012

Sparkle N Sprinkle Sketch Challenge and Technique Tuesday


Hello! I hope all of you had a wonderful Christmas and I am wishing you a Happy New Year! First I want to show you a card that I made following the Sparkle N Sprinkle sketch for their challenge this month. I used the Bird & Blossoms digi stamp by Beccy Muir. I love these digi stamps and you can see more by clicking here. The flowers are stamps from the Blossoms 429 set. The saying is from the Just For You set 444. I did a little twist to the sketch by making the strip into a flap to open for the saying. I hope you will join the challenge for a chance to win a stamp set! I can't wait to see what you make!


snssc15 Card due 12-25


Now on to the Sparkle N Sprinkle Technique Tuesday!


I hope you are ready for another year of great crafting. I want to show you a technique that I came up with last week that I call stained foil. I wanted a shimmery looking wintry background and this is what I came up with. I hope you like it and will try it out.


Supplies needed:
  1. Super Adhesive Sheets
  2. foil
  3. Distress stains -- white, blue and pink
  4. paper towel or tissue to wipe stain
  5. white card stock
Peel off one side of the sticky paper and adhere card stock to it. Peel off the other side of the sticky paper and adhere the foil.


Take the white stain and rub it all over the foil piece.  Then take a tissue and rub it lightly over the white stain to spread it out into a thin layer.


I let this dry. It did not take long and then I ran the card through an embossing folder.  I added blue stain for the sky and spread it with a tissue again.


Next I added some more white and smoothed it out and then added some pink. You may want to add some more and pink to get the effect that you want. The white stain seems to help the colored stains to not smear off the foil.


Here is the end result.


Here is another one I did using different colors.


Thank you for taking the time to stop by.  I hope you will try this technique on some of your winter cards. Have a wonderful day!

April

Sparkle N Sprinkle supplies used:
  1. Snow Birds 3044-385E
  2. Vanilla Ice embossing powder EP265
  3. Cloud Nine velvet glitter GM2000
  4. Super Adhesive Sheets 99558
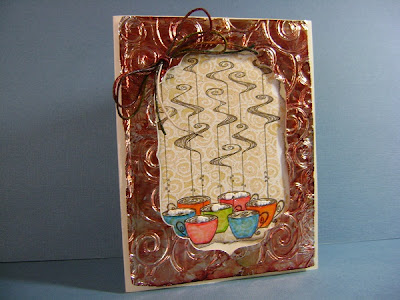


Happy New Year!

Hello and welcome to my blog! Thanks for stopping by today. I cannot believe we are starting a new year! This year has flown by. I want to wish you a happy and prosperous New Year! Stay warm and cozy this January too! We have gotten some cold weather lately!


Wednesday, December 26, 2012

Sending Love

Hi Everyone! Thank you for taking time to stop by my blog today. I hope you had a wonderful Christmas! I want to show you a card that I made for the Impression Obsession Sending Love challenge. For the background I used Cover-A-Card Paisely CC039 that I stamped in pink. Then I used Cover-A-Card Script CC050 that I stamped in black. I love using pink and black together which I haven't used in a long time. The cupcake stand and You Make Life Sweet stamps are from the clear set MC181Cupcake. Enjoy your day today. If you are one of those hitting the clearance racks today, stay safe and I hope you find great bargains! Have a good day!


Monday, December 24, 2012

Merry Christmas!

Hello and welcome to my blog. With all the hustle and bustle of the season I wish to pause and reflect on why we have Christmas in the first place. "For unto you is born this day in the city of David a Savior, which is Christ the Lord." Luke 2:11. My sweet friend, Kim, gave me this stamp recently and I just had to use it. Thanks so much, Kim! Merry Christmas and God bless you all!


Monday, December 17, 2012

Technique Tuesday -- Multi-embossing Folders


Hello and welcome to Sparkle N Sprinkle Technique Tuesday! I cannot believe Christmas is a week away! I hope you are winding down a little now and can sit back and enjoy the season.  I want to show you a fun technique that I learned not long ago. I ended up making quite a few backgrounds because I just loved the way it looks.


Supplies needed:
  1. embossing folders
  2. any card stock or patterned paper
  3. inks to coordinate with patterned paper
  4. sponges
I will show you this technique using white card stock first. Line up the embossing folders the way you want them on the card piece. Remember that these will all have to run through the embossing machine all at once. This can be tricky, but play with it a little and it can be done! I used some border embossing strips on some of these as well.
Here is how it looked after I ran everything through.
I really like how this looks on patterned paper. This is the paper I tried first.
These are the folders I used.
I then used some ink and a sponge and sponged over the raised areas.
Here are some more that I made. It was fun playing with these and coming up with different looks.
Thanks so much for stopping by. I hope you will have a little time to try this out.  Due to Christmas being next Tuesday, I will not be showing a technique.  I will be back again on January 1st! Thank you for for your support this year and for all the wonderful comments. I wish each one of you and yours  a most blessed Christmas!
APRIL
Sparkle N Sprinkle supplies used:
  1. Vivian 0903-164M
  2. Champagne Glitter G1045

Friday, December 14, 2012

Christmas Glow

Hi Everyone! I hope you are enjoying your day. It is beautiful here today. I want to share a card that I made a while back. I had an incident with my cat, Pepper, who decided to chew through the light cord on my tree! She got a good shock and ALL the lights went out on my tree that I JUST decorated! I had to take the lights down through all the garland and ornaments and then put up new lights. The new lights are strung on the outside of the tree now and then I have tried pushing them in so that they don't look so weird! Maybe I should have used candles! Then she would have burned the house down. YIKES! Anyway, this card reminds me of my tree this year. I used wrapping paper for the background. Thanks for stopping by. Have a wonderful day!

Monday, December 10, 2012

Technique Tuesday -- Wax Paper Resist and Embossing Folder


 Hi Everyone! Welcome back to Sparkle N Sprinkle Technique Tuesday! I hope you are having fun getting ready for Christmas and not having things be too hectic. I want to show you an easy background to make for your Christmas cards. It is called wax paper resist.  Maybe you will have some time to use this on a last minute Christmas card.


Supplies needed:
  1. a  piece of wax paper
  2. embossing folder
  3. 2 pieces of glossy card stock
  4. ink ( I used green )
  5. sponge or brayer
  6. paper towel
Place wax paper inside the embossing folder and run it through your embossing machine.


Now place the wax paper in between two pieces of glossy card stock making sure the glossy side of each piece is against the wax paper.  Iron the "sandwich" on high for a few seconds.  The wax will transfer to the glossy card stock and leave the pretty pattern. You can barely see it here on the white card stock.


Take your ink and sponge over the whole card in a circular motion and you will see the pattern appear. Wipe off any excess ink with the paper towel.


I also made another background and brayered it using a multi-colored ink pad.


If you would like to know how the bottom border on the card was made you can see the instructions here. I hope you enjoyed this quick technique today. Thanks so much for taking the time out of your busy holiday schedule to take a look! Enjoy!

APRIL

Sparkle N Sprinkle supplies used:
  1. Gypsy Red Velvet Glitter GM2005
  2. Cloud Nine Velvet Glitter GM2000
  3. Nestle in for Christmas 0342-119P


Thursday, December 6, 2012

12 tags of 2012 -- December

Hi Everyone! After about a week of Spring weather it is feeling more like Christmas today. We have come to the end of Tim Holtz's tags for 2012. I had a lot of fun making this Christmas tag. I made it small enough to put on the front of a Christmas card. The cardinal is an Inkadinkado stamp and the music script is from Stampabilities.  For the snow, I used White Detail and Sparkle embossing powders from Sparkle N Sprinkle. Thank you for stopping by. I trust your day has been a good one!


Monday, December 3, 2012

Technique Tuesday -- Snowy Background


Welcome back to Sparkle N Sprinkle Technique Tuesday!  I hope you are enjoying your day.  I want to show you a technique that makes a wonderful snowy background for your Christmas cards.


Supplies needed:
  1. super thick embossing powder
  2. sponges
  3. white card stock
  4. pink and blue inks or other colors
  5. heat gun
  6. paper towel
  7. Versa Mark ink pad
First pat the Versa Mark ink all over the white card stock.


Sparingly sprinkle on the super thick embossing powder.


Heat set the embossing powder,  heating the piece from the underside. This way the embossing powder will not blow off the card. You will see little bubbles of melted powder when you are finished.


Take your sponge, starting with the lightest color,  and randomly sponge over the melted embossing powder and then do the same with the second color.


Take the paper towel and rub over the piece to get any excess ink off the embossing powder. Now you have a snowy background for your card.


This is really easy and it looks great! I love easy!  I hope you give this a go. Thanks for stopping by. Have a great day!

April

Sparkle N Sprinkle Supplies used:
  1. Versa Mark ink pad 99702
  2. Cerulean Star embossing powder EP433
  3. Poinsettia Ornament 3339-418E
  4. Merry Christmas 2     3378-418AA
  5. Spellbinders Heirloom Ornaments dies SB100

Blog Archive