Welcome

Hello and welcome to my blog of card crafts. I am happy that you stopped by for a visit. I hope you can visit often. Have a wonderful and blessed day! "I will praise thee; for I am fearfully and wonderfully made: marvelous are thy works; and my soul knows right well." Psalm 139:14

Wednesday, September 30, 2015

Oldies Technique #18 -- Collage Stamping

Hi Everyone! I hope you are having a good day. I want to show you a Thanksgiving card I made using the collage technique.This is a bit different than just random stamping in that you need to plan a bit about what stamps you will use and what you want to emphasize on your card. To some this can seem intimidating but it really is fun.


Supplies you will need:


several stamps ( they do not need to relate )
several colors of ink ( I used Distress inks )
light card stock


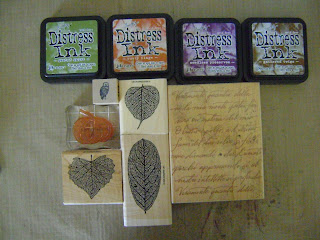
Here are the inks and stamps I used.


I started off using my script stamp. I stamped some of the stamp off the page to give the idea of the pattern going on. I did this with a lot of my stamps.


Now just keep building upon your stamps. Next I used the pumpkins across the bottom.


When stamping the leaves, I stamped directly and then stamped off once and stamped on the card stock to make some of the leaves lighter to look like they were in the background.


At this point I thought I was through, but it seemed like there was too much white space, so I stamped 2 more leaves lightly to fill in the space and added the owl. I think that helped it look better. You can keep going until you have the look you want.


I hope you will have fun playing. It may take some experimenting to get what you like, but I think you will have fun with this and it gives a neat look to your cards.


Thanks so much for stopping by. Have a wonderful and blessed day!


Challenges entered:

Chocolate, Coffee and Cards:  Celebration ( Thanksgiving )
Penny's Paper Crafty:  Anything Goes
Simon Says Wednesday Challenge:  Anything Goes
Word Art Wednesday:  Anything Goes


Tuesday, September 29, 2015

Go For The Gold

Hi Everyone! I hope you are having a good day. I want to share a card I made using a product that I have not used in a long time, thanks to inspiration on Sandy Allnock's blog! She is sharing free classes for a week and showing some wonderful techniques and products! For this card I got my inspiration from class day 2.


I love Fall and all its beautiful colors. I really had fun making this card and being creative with the leaves. I cut the leaves out of thin cardboard using dies and brushed crackle paint over them. After the paint dried and crackled, I painted them with a gold pigment powder by adding water to the powder. I have had this product for years and I love how it shines. I also painted the gold around the edges of the second layer of card stock to match the leaves.


I made the background for the card by patting Distress inks on my craft pad spritzing them with water and swiping the card stock through them. I added interest by stamping a script background, wire and dots to it.

Thanks so much for stopping by. I hope you have a wonderful and blessed day!

Challenge entered:

Sandy Allnock:  Go For The Gold  ( crackle paint - day 2 )


Sunday, September 27, 2015

Masked Christmas Tree

Hello again! I want to show another Christmas card I made using a masked Christmas tree. I stamped the tree on watercolor paper, used Diamond Glaze over it and then water colored with my Color Burst powders. I ran the patterned paper through a snowflake embossing folder and used white embossing powder on the raised snowflakes. I found the little penguin in a stamp set I have from Fiskars. I have not used this stamp in a long time. I think he is a cutie! My Christmas cards are almost finished for this year! Yeah! Thanks for stopping by. Have a great day!


Challenges entered:

Chocolate, Coffee and Cards:  Celebrations
Scrapy Land:  Add an Image
The 12 Months of Christmas Challenge: Oh Christmas Tree


Thursday, September 24, 2015

Oh Christmas Tree

Hello and welcome to my blog. I am happy you stopped by today! I want to show you a Christmas card I made using the Christmas tree stamp from the Just Believe stamp set by Stamper's Anonymous. I made my own background by using a gingham background stamp, stamping with Fired Brick Distress ink and stamping on kraft card stock.


The theme for my Christmas tree at my house is "outdoors". I have all kinds of animals and outdoor ornaments on my tree. For this tree on my card I added White Liquid Applique to the branches along with Clear Rock Candy Distress glitter to add sparkle.


To add some interest to the deer I used a snowflake embossing folder.


Thanks so much for stopping by. I hope you have a wonderful day!

Challenges entered:

ABC Christmas:  S is for Silent
Crafty Hazelnut's Christmas Challenge Extra:  Anything Goes/Christmas
Simon Says Wednesday Challenge: No Designer Paper
Sweet Stampin':  Emboss It
The 12 Months of Christmas: Oh Christmas Tree


Sunday, September 20, 2015

Whooo's Haunting?

Hi Everyone! I trust you are having a good day. I have been showing a lot of Oldies techniques on my blog this year, but I want to show a NEW one I found online recently. It's a great technique for all those "spooky" cards for Halloween.

This is so easy and fun. I took glossy card stock and patted Mustard Seed, Ripe Persimmon, and Black Soot Distress inks on it. I made sure the black was on the outer edges. I spritzed water on the inked card stock and used my finger to blend the colors. I love the look this gives!


I used the Pumpkin Patch stamp from Impression Obsession F16031. The owl is a cuddlebug embossing folder. I swiped black ink over him so he would stand out. The leaves were cut from inked card stock using cuttlebug dies.

Thanks so much for stopping by. I hope you have a wonderful day!


Challenges entered:


Impression Obsession: Happy Haunting
Paper Take Weekly:  Animal Magic
Sweet Stampin':  Emboss It


Thursday, September 17, 2015

Oldies Technique #17 -- Coloring With Embossing Powders

Hi Everyone! I hope you are having a good day. It is officially Fall so I want to show you a neat Oldies technique that looks beautiful with leaf stamps. We will be "coloring" with embossing powders.


Supplies you will need:


several colors of embossing powders ( I used powders with glitter in them )
watermark ink ( I used Versa Mark ink )
anti-static bag
paper to catch embossing powders
heat tool


Rub the anti-static bag over the card stock so that the embossing powders do not stick where you do not want it. Ink your stamp with Versa Mark ink and stamp onto the card stock.


Here is the fun part. Take pinches of the powders and sprinkle over the leaves one color at a time. It does not matter if you overlap. The overlapping makes the colors blend into each other.


Take the heat tool and melt the powders. I love how the colors just pop!


That is all there is to it! I hope you have a fun time trying this technique. Have a great day!


Challenges entered:


Scrapy Land:  Add An Image -- (Spellbinders small oval die)
Simon Says Monday Challenge:  Love This Technique (coloring with ep)


Saturday, September 12, 2015

Flap Card

Hi Everyone! I hope you are having a good day. I want to share a flap card I made for the Word Art Wednesday challenge, Let's Celebrate! They are celebrating their 200th challenge this week!

I found how to make this flap card online and I love how it folds out. Here is the closed card.


I stamped the butterfly on shrink plastic and colored it, then added it to the card to keep the flap closed.


Here is the card with the flap opened.


Now this is the card all the way opened.


I added rhinestones to some of the flower centers.


I really love making this flap card and while I was at it I made a few more!

Thanks so much for stopping by. Have a blessed day!


Challenge entered:  Word Art Wednesday:  Let's Celebrate!


Thursday, September 10, 2015

Quiet Garden

Hi Everyone! I hope you had a good Labor Day weekend. I want to show you a tag I made using alcohol inks, a stencil and some acetate.


I used glossy card stock, put various purple and blue alcohol inks along with silver on my craft mat. I swiped the card stock through the ink for my background. I laid the leaf stencil over the background and used translucent stencil paste. After it dried I outlined the leaves with a white marker.


It was fun using my new dragonfly stamp from Our Daily Bread. The dragonflies were stamped on acetate and glittered on the back of the wings. I fussy cut them to add to the tag.


Thanks so much for stopping by. I hope you have a wonderful and blessed day!


Challenges entered:

Artistic Stamper:  Things With Wings
Mod Squad:  Marvelous Marbling
Paper Take Weekly:  Things With Wings
Simon Says Wednesday Challenge:  Use a Stamp
Tim Holtz 12 Tags of 2015: September


Thursday, September 3, 2015

Oldies Technique #16 -- Gold Leaf

Hello and welcome to my blog. I am sharing another Oldies technique today. I have not used this product in ages but it is so pretty! I need to use it more! Gold Leaf is gold that has been pounded into a very thin sheet. You can purchase gold leaf flakes from various stamp companies. I have also seen it at Hobby Lobby and Michael's. I will be using these flakes on my cards today. I will be showing 2 different ways to use gold leaf on your cards.


For the first method you will need these supplies:


gold leaf flakes
double sided sticky paper
die ( I used Spellbinder's Fantastic Flourish 2 )
stiff brush
card stock ( I used cream)
paper to catch left over flakes


Use the die to cut from the double sided sticky paper. Peel off the back layer and adhere it to your card.


Peel off the top layer and start adding on the gold leaf flakes.


Pat down the gold leaf flakes and burnish with your fingers until all the flakes are flat.


Now take the stiff brush and brush over the image to get any other small gold leaf pieces off.


Here is the finished piece! I love the variegated  colors and shine.


I cut a small piece of double sided sticky paper and added more gold leaf flakes to it and added this piece behind a die cut window to look like stained glass.


Here is the second method. 


Supplies you will need:

gold leaf flakes
glue stamp pad ( I used the glue pad from Tsukineko )
stamp
card stock ( I used dark brown )
stiff brush


Gold leaf shows up so nicely on dark card stock, so on this card I used dark brown. Stamp your image using the glue ink pad and stamp onto the dark card stock. Make sure you wash off your stamp quickly.


Sprinkle the gold leaf flakes over the image pat, burnish and brush as was shown above!


Thanks for stopping by. Have a wonderful and blessed day!

  Dies used:  

First card:

Fantastic Flourish -- Spellbinders
Stained Glass Vitrail -- Spellbinders
Bird die from Sizzix I Love You Stamp set

Second card:

Beaded Oval -- Spellbinders


Challenges entered:

Artistic Stamper:  Things With Wings
Chocolate, Coffee and Cards:  Fancy and Feminine
Crafting From the Heart:  Anything Goes #75
Scrapy Land:  Anything Goes/ die
We Love 2 Create:  Anything Goes #18


Blog Archive