Welcome

Hello and welcome to my blog of card crafts. I am happy that you stopped by for a visit. I hope you can visit often. Have a wonderful and blessed day! "I will praise thee; for I am fearfully and wonderfully made: marvelous are thy works; and my soul knows right well." Psalm 139:14
Showing posts with label charms. Show all posts

Monday, December 10, 2018

Shabby Chic #23

Hi Everyone! Christmas is approaching fast! I want to show you a shabby chic shaker card that I made. I have been making more shaker cards lately and love them. They are so much fun!


I made the card shape using the Precious Marieke flowers frame background and sponged brown ink around the edges. The white flower frame goes with it. I then cut a pink frame using a frame die from Nellie Sellen. Lastly, I cut a white circle using the Gina Marie stitched circle die. The snowman stamp is from Inkadinkado. The image was colored using alcohol inks. The saying is from Just For Fun Stamps. Flowers, ribbon and pearls were used for accents. I used plastic snowflakes and clear sugar beads inside the shaker.

Thanks so much for stopping by. I hope that you are enjoying the Christmas season. Have a wonderful day!

Chalenges entered: 

CHNC Christmas Challenge: Anything Goes #415
CHNC Patterned Paper Challenge:  December 2018
Simon Says Monday Challenge:  Warm Winter Wishes
The Paper Girls:  #165 Die Cuts


Wednesday, September 20, 2017

Bits and Bobs #18

Hi and welcome to my blog! I want to show you another bits and bobs card I made. I love going through my stash and finding old things to use on my cards. I found a piece of canvas and dropped colors of Color Bursts over it and spritzed with water. When it dried I stamped some swirls around the edges using Teal Blue Staz On ink. I used Versa Mark ink to stamp the flower, sprinkled white embossing powder over it and heat set. Who knew that one could stamp so well on canvas! I used a piece of torn handmade paper that I had in my stash to place behind the canvas piece.  These were adhered to an embossed teal background. I also added some ribbon, a dragonfly charm and a few rhinestones from my stash.


Thanks so much for stopping by. I hope you will pull out some old things from your stash to see what you can make with them. Have a wonderful and blessed day!


Monday, May 15, 2017

Mice Wishes

Hi and welcome to my blog. I am enjoying so much being a guest designer for House Mouse Designs! The theme for this new challenge is Embossing (wet or dry). I used a lot of embossing powder on my card today.


I just got this fun stamp and I had to use it. The bubble background was made by laying a circle stencil on dark blue card stock, applying transparent embossing paste and sprinkling on clear glitter embossing powder. I then heat set it. The image was colored using Spectrum Noir markers. I added different colors of marbled embossing powders to the bottom of the fish bowl to make it look like colored pebbles. I then added clear sparkle embossing powder over the entire fish bowl. You can see it better in this picture.


The white frame was made by using Martha Stewart corner and border punches.

Thanks so much for stopping by. I hope you have a very "mice" day!

Challenges entered:

One Crazy Stamper:  Anything Goes
Mod Squad:  Let's Color

Wednesday, November 16, 2016

Altered Dies #22

Hi Everyone! Are you ready for Thanksgiving? This card might put you in the spirit! Humor got the best of me with this quirky turkey! The saying is computer generated.


I don't really have any turkey stamps except for one small one. I really need to look at buying a few, so I made this fun turkey using a die and a chicken stamp by Sparkle N Sprinkle!


I started off  by cutting with the Cheery Lynn Mega Italian Flourish die. I cut from a background I had made a long time ago with alcohol inks.


The die was a little larger than the background, but I knew I would be cutting off some of the bottom anyway. I then cut between the scallops and this became the turkey's tail feathers!


The "turkey" is a chicken stamp courtesy of Sparkle N Sprinkle. I colored him with Spectrum Noir markers, fussy cut him and pop dotted him on top of  the "feathers."

I hope you enjoyed my altered die card today. Thanks so much for stopping by. Have a great day!

Challenges entered:

Crafty Creations:  Animals
Scrapy Land:  Give Thanks
Word Art Wednesday:  Anything Goes #256-257


Sunday, August 21, 2016

Just Beachy

Hi! I hope you are having a good day. I have made several projects with a beach theme lately. I must have the beach on my brain! I went to the beach in June and I guess I need some more time at the seashore. I made a beach themed tag this time using 2 techniques that Tim Holtz showed on his blog.


I stamped several seashells and fish on the background with Faded Jeans Distress ink. The die is Cattails from Spellbinders. The die cut from tag board is a Cheery Lynn die. I added centers to the tag board using the same die and cut from shimmer sheets, cream handmade paper and brown mulberry paper. At the bottom I added Mudd Puddles mini shells  and Champagne glitter from Sparkle N Sprinkle.

Thanks so much for stopping by! Have a blessed day!


Challenges entered:

Simon Says Monday Challenge:  Summer Fun

Thursday, April 28, 2016

A Butterfly Hello

Hi Everyone! Welcome to my blog. I want to show you a card I made today using some metals and background stamps.


The butterfly was made by heating copper mesh with a heat gun to give it various colors. I then adhered a gold outline butterfly sticker to the copper mesh and fussy cut it. The "hello" is a metal charm that I colored with a teal Sharpie marker. I used Distress ink to dye my ribbon to match.


I made the background by using two Impression Obsession Cover A Card stamps -- Butterflies CC061 and Textural Dots CC016. I stamped these on some light patterned paper. Here is a close up to see the background better.


Thanks so much for stopping by. I hope you have a great day!


Challenges entered:

Impression Obsession:  Happy Hellos
Really Reasonable Ribbon:  Things With Wings
Simon Says Monday Challenge:  Show Us Your Metal
Simon Says Wednesday Challenge:  Anything Goes
Tuesday Throwdown:  Anything Goes


Thursday, March 10, 2016

Rustic Bunny

Hi Everyone! Welcome to my blog. I want to share a tag I made using a Sizzix bunny die. At first I was going to use the negative cut of the bunny but to me it looked like a warped mushroom! LOL! So instead I used the cut out of him. I cut him from a cardboard lid, peeled off some of the top layer to show some ridges. I swiped over the ridges using a Distress Black Soot ink pad. I also sprayed some Pewter Distress ink on him. Last I used Tim Holtz Speckles stencil to add some spots to the bunny. I made the background using Tim Holtz Alteration Collection dies and following this technique here. I added butterflies to the tag using Tim Holtz Butterfly Frenzy dies.


Thanks so much for stopping by. Have a great day!


Challenges entered:

Love 2 Create:  Challenge #5
Simon Says Monday Challenge:  Make Your Own Background
Tim Holtz 12 Tags of 2016:  March

Monday, February 8, 2016

Love

Hi Everyone! Welcome to my blog. I want to show you a tag I made with these sweet chickadees by Sparkle N Sprinkle.


I made the background using the splatter stencil from Tim Holtz and doing the mono printing technique here. I used Tumbled Glass and Weathered Wood stains. You can see the white splatters in the middle of the tag.


Next I used white matte embossing paste and Tim Holtz's snowflakes stencil. I added Stickles Diamond glitter glue on the snowflakes to make them sparkle.


                Thanks so much for stopping by. I hope you have a wonderful day!


Challenges entered:


Crafty Cardmakers:  Love, Love, Love
Our Crafty Corner:  Anything Goes Challenge 6
Simon Says Wednesday:  Have A Heart
Tim Holtz: 12 Tags of 2016 - February
We Love 2 Create:  Anything Creative Mixed Media Goes Challenge 3


Wednesday, February 3, 2016

Altered Dies #3

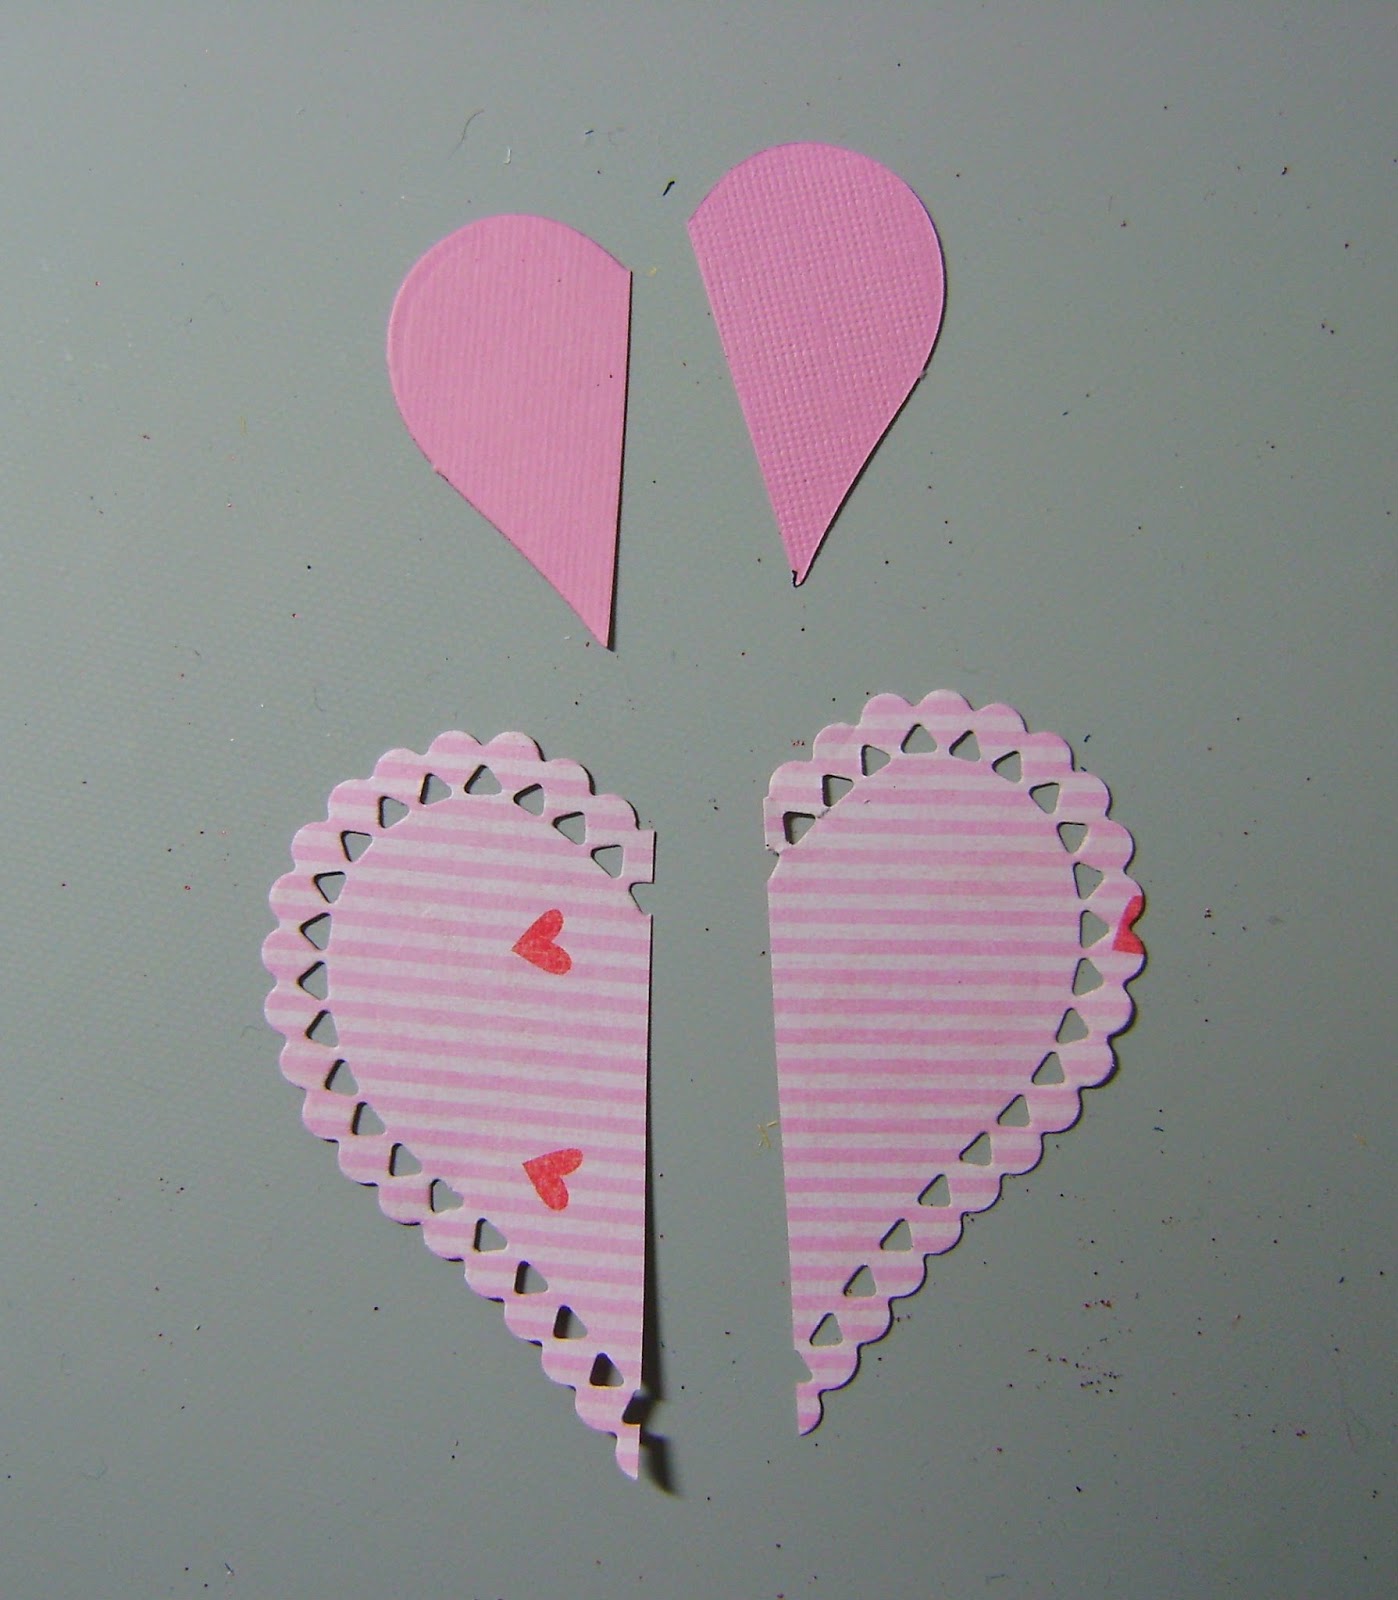
Hi Everyone! Can you believe that Valentine's Day is right around the corner? I want to show you a Valentine I made with altered dies. I will be showing you how I made these sweet love birds using heart dies and a round punch!


I started with these 2 Nellie Snellen heart dies and used patterned and plain pink card stocks to cut them from.


I cute the hearts in half to make the body and wings of the birds.


I layered them like this and added a punched circle from patterned card stock for the heads. I also cut 2 scallops off one of the hearts for the beaks.


Next I used a my new Wreath die by Spellbinders and cut it apart to make branches.


I stamped the word "love" on a Spellbinders Fancy Labels die and pop dotted it to the card and added a heart charm.


I hope you enjoyed seeing how you can use your dies in different ways to make something totally new. Thanks so much for stopping by. Have a great day!


Challenges entered:

Dies R Us:  Love
Scrapy Land:  Anything Goes
Simon Says Wednesday Challenge:  Have A Heart


Sunday, January 17, 2016

Ombre

Hi and welcome to my blog. I am happy you stopped by today. I want to show you a card I made using the ombre technique. This was new to me but easy to do. Ombre means graduated color. I sponged darker blue to lighter blue colors on glossy card stock starting with the darker color at the top. I used an old stamp I had from Our Daily Bread to stamp over the colors. I used a newly purchased die from Spellbinders called Vintage Flourish Pattern for my music notes. I faux stitched around the die and the card.


Thanks for stopping by. I hope you have a fantastic day!


Challenges entered:

Dies R Us:  Stitching
Frilly And Funkie:  Sing Sing Sing
Simon Says Wednesday Challenge:  Ombre

Sunday, January 10, 2016

Enjoy The Journey

Hi Everyone! Happy New Year! I trust you will enjoy the journey of 2016. Here is a New Year tag I made inspired by Tim Holtz's January tag for 2016. You can see his demo here. He combined two previous techniques on his tag. For my chalkboard technique I used white embossing powder and lightly brushed white chalk over the images.


For the industrial technique I used Staz On jet Black ink since I did not have any black paint. It worked well!


Thanks for stopping by. I hope 2016 is your best year yet!


Challenges entered:

Tim Holtz 12 Tags of 2016:  January


Sunday, November 8, 2015

Thanks Tag

Hi Everyone!

I hope you are having a good day. I can't believe it is already November. It doesn't even feel like November here. It has been feeling a lot like Spring along with the rain too! I want to show you a Fall tag I made using some fun techniques. For the background I stamped a basket weave background stamp using tan acrylic paint. After it dried I applied Walnut Distress stain over it. Next I spritzed some water over it to lighten the center to give it a more distressed look. I also did a little stamping on the edges of the tag.


I wanted to use gold foil around the edges of my tag, but among ALL the colors of foil I had I did not have gold! LOL! So I used a glue stick on the edges and applied some gold leaf instead.


The pumpkins were stamped on watercolor paper and colored with Distress markers and a water brush. I fussy cut them to add to the tag. I swiped colors of  Distress inks on my craft pad, spritzed with water and swiped my card stock through the inks and let it dry. I then punched out the leaves to add to the tag. I used a thick cream color embossing powder on the fancy label and stamped Thanks on it.


Thank you for stopping by. I hope you have a wonderful and blessed day!


Challenges entered:

Love to Create Challenge #23:  Anything Mixed Media/Creative
Simon Says Wednesday Challenge:  Thanks/Thanksgiving
Tim Holtz :  12 Tags of 2015 -- November

Wednesday, November 4, 2015

Oldies Technique # 20 -- Mono Stamping With Craft Foam

Hi Everyone! Welcome to my blog. I have another Oldies technique to share with you today. I hope you will enjoy trying this.


Supplies you will need:

craft foam
embossing folder
pigment ink
brayer
heat tool


I used a cuttlebug embossing folder for my impression. You can use other things like stamps, coins, etc. -- anything that will press into the foam. 


Have the embossing folder turned where the raised impression is on the top. Heat the craft foam with the heat tool for about 30 seconds. Quickly place the heated foam in the embossing folder and roll the  the brayer over top of the embossing folder several times in order to make a good impression.


This is how mine looked after I took it out of the embossing folder.


I used  brown pigment ink on the craft foam because it stays juicy longer, but you can try other inks to see how they work. I rubbed my ink pad over the foam a few times and this is how it looked.


Lastly I placed my yellow piece of card stock over the craft foam and brayed over it to get a good impression on the card stock. This is the end result!


I hope you enjoyed seeing this technique. Thanks for stopping by and have a great day!


Thursday, September 10, 2015

Quiet Garden

Hi Everyone! I hope you had a good Labor Day weekend. I want to show you a tag I made using alcohol inks, a stencil and some acetate.


I used glossy card stock, put various purple and blue alcohol inks along with silver on my craft mat. I swiped the card stock through the ink for my background. I laid the leaf stencil over the background and used translucent stencil paste. After it dried I outlined the leaves with a white marker.


It was fun using my new dragonfly stamp from Our Daily Bread. The dragonflies were stamped on acetate and glittered on the back of the wings. I fussy cut them to add to the tag.


Thanks so much for stopping by. I hope you have a wonderful and blessed day!


Challenges entered:

Artistic Stamper:  Things With Wings
Mod Squad:  Marvelous Marbling
Paper Take Weekly:  Things With Wings
Simon Says Wednesday Challenge:  Use a Stamp
Tim Holtz 12 Tags of 2015: September


Thursday, September 3, 2015

Oldies Technique #16 -- Gold Leaf

Hello and welcome to my blog. I am sharing another Oldies technique today. I have not used this product in ages but it is so pretty! I need to use it more! Gold Leaf is gold that has been pounded into a very thin sheet. You can purchase gold leaf flakes from various stamp companies. I have also seen it at Hobby Lobby and Michael's. I will be using these flakes on my cards today. I will be showing 2 different ways to use gold leaf on your cards.


For the first method you will need these supplies:


gold leaf flakes
double sided sticky paper
die ( I used Spellbinder's Fantastic Flourish 2 )
stiff brush
card stock ( I used cream)
paper to catch left over flakes


Use the die to cut from the double sided sticky paper. Peel off the back layer and adhere it to your card.


Peel off the top layer and start adding on the gold leaf flakes.


Pat down the gold leaf flakes and burnish with your fingers until all the flakes are flat.


Now take the stiff brush and brush over the image to get any other small gold leaf pieces off.


Here is the finished piece! I love the variegated  colors and shine.


I cut a small piece of double sided sticky paper and added more gold leaf flakes to it and added this piece behind a die cut window to look like stained glass.


Here is the second method. 


Supplies you will need:

gold leaf flakes
glue stamp pad ( I used the glue pad from Tsukineko )
stamp
card stock ( I used dark brown )
stiff brush


Gold leaf shows up so nicely on dark card stock, so on this card I used dark brown. Stamp your image using the glue ink pad and stamp onto the dark card stock. Make sure you wash off your stamp quickly.


Sprinkle the gold leaf flakes over the image pat, burnish and brush as was shown above!


Thanks for stopping by. Have a wonderful and blessed day!

  Dies used:  

First card:

Fantastic Flourish -- Spellbinders
Stained Glass Vitrail -- Spellbinders
Bird die from Sizzix I Love You Stamp set

Second card:

Beaded Oval -- Spellbinders


Challenges entered:

Artistic Stamper:  Things With Wings
Chocolate, Coffee and Cards:  Fancy and Feminine
Crafting From the Heart:  Anything Goes #75
Scrapy Land:  Anything Goes/ die
We Love 2 Create:  Anything Goes #18


Wednesday, August 19, 2015

Oldies Technique #15 -- Polished Stone

Welcome back to another Oldies technique. I love using this polished stone technique because no piece ever looks the same. I also want to thank Debs Smith for joining my blog!


Supplies you will need:


several colors of alcohol inks
white glossy card stock
felt applicator
91% alcohol or blending solution


I wanted an old world look on my card so I chose Current, Slate, Ginger and Latte alcohol inks. Apply the inks to the applicator. I just cut a small piece of felt to fit the applicator and applied my inks side by side in a row.


Spritz the applicator a few times with alcohol or blending solution ( I used 91% alcohol ) and start pouncing the applicator over the glossy card stock. You will also want to make sure you are in a well ventilated room!


Here is the finished background!


You can also do this same technique on plastic or acetate. In fact you can used this on any non porous surface. I love the look of it done on plastic as shown below.


Thanks so much for stopping by. I hope your day is wonderful!


Challenges entered:

Crafting From The Heart:  Always Anything Goes #73
Penny's Paper Challenge:  Anything Goes


Blog Archive